Create a Mac Style Home Icon in Photoshop
Preview of Final Results
3d logo ေလးတစ္ခုၿဖစ္ဖို ့ အဆင့္ 50 ေလာက္ေက်ာ္ၿဖတ္ရမွာၿဖစ္တဲ့ အတြက္နည္းနည္း ခက္ေနမယ္ထင္ပါတယ္
ၾကိဳးစားၾကည့္လိုက္ၾကပါဦး.....။
Step 1 - Creating New Document.
Create a new document (Cmd/Ctrl +N) with these setting:.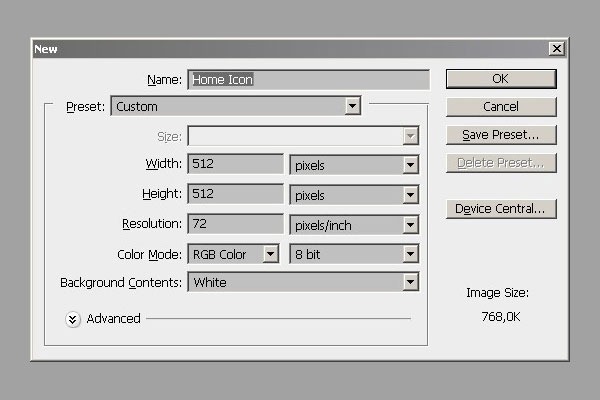
Step 2 - Creating Shape For Roof.
Activate rounded rectangle tool . On the option bar, set to shape layer, with 20 px radius, set color to #a2a2a2. Create a shape.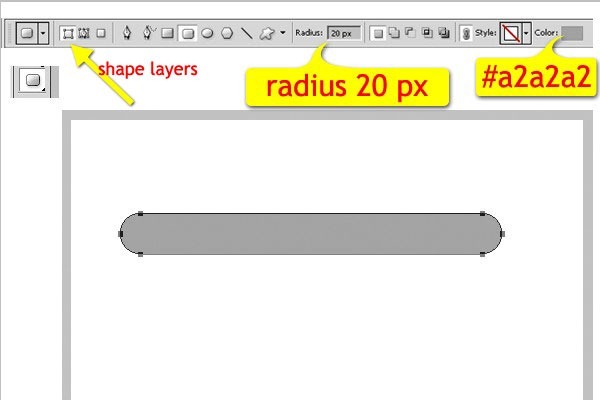
Step 3 - Modifying Path.
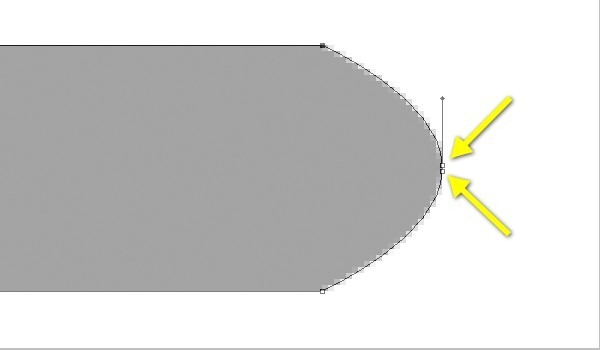
Activate Convert Point Tool. And click on these points shown below to convert them into angles.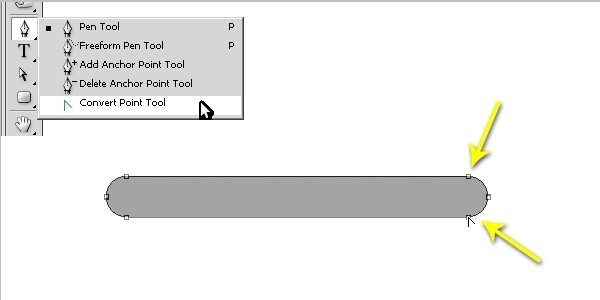
Step 4 - Modifying Path Again.
With pen tool and its "Auto Add/Delete", delete the anchor points below.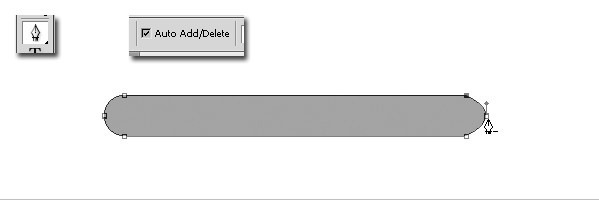
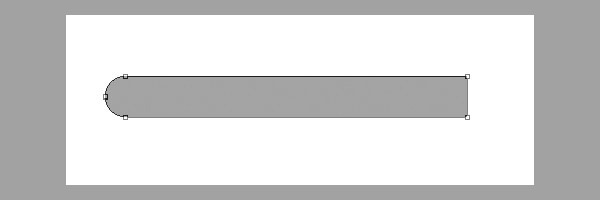
Step 5 - Duplicating Path.
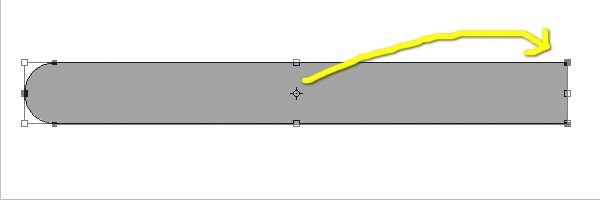
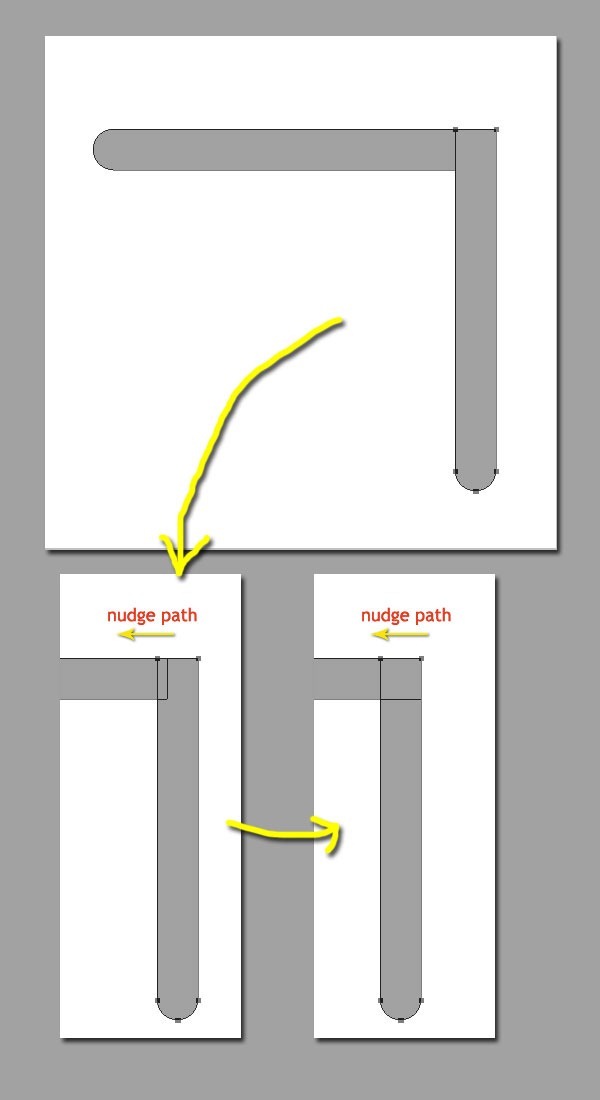
Use "Ctrl/Cmd + C" to copy path, then paste path "Ctrl/Cmd + V".Now we have two path in one layer. And then we'll make them into a 90 degree angle. Use "Ctrl/Cmd + T", and move the center of transform control to top right corner.
Step 6 - Preparing for Highlight (Duplicating Path and Scaling Down).
Now, we need to duplicate the layer with "Cmd/Ctrl + J". And name it "highlight". Then transform the paths on this new layer. Hit "Cmd/Ctrl + T" to show transform control. To get easier transforming, we can use Alt and Shift key. Scale down horizontally first, an then scale down vertically. Just like this.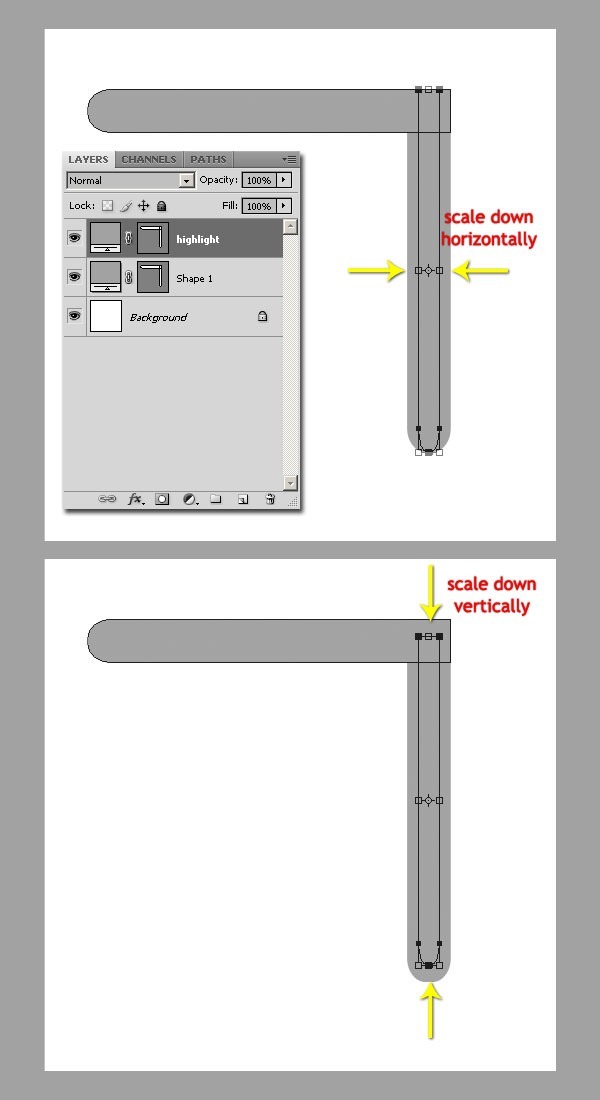
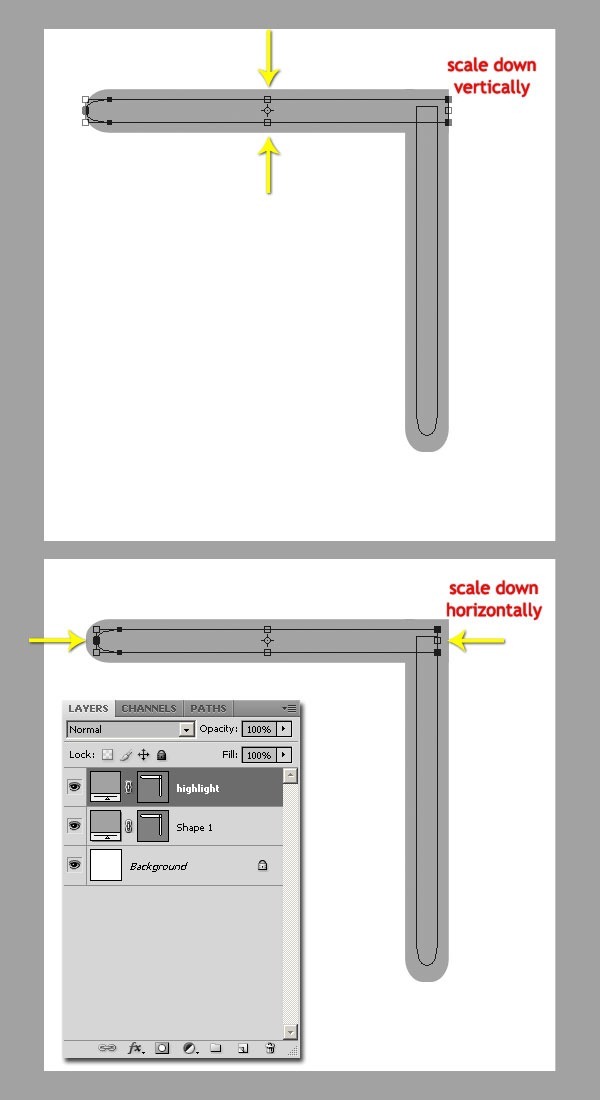
Step 7 - Rasterizing.
On the layer pallette, right click on "highlight" and select "Rasterize Layer". Or we can access it on Menu Layer > Rasterize > Shape.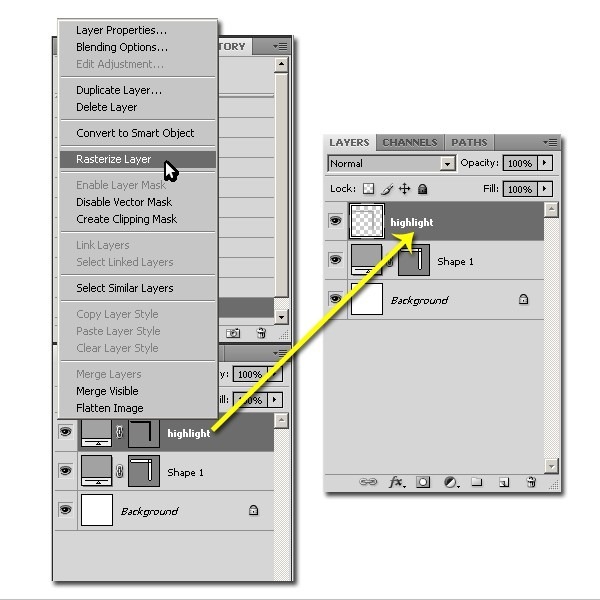
Step 8 - Selection
On layer palette, Ctrl + Click on "highlight" layer thumbnail to load selection. Then click menu Select > Modify > Feather or use "Shift + F6". Give 10 pixels radius.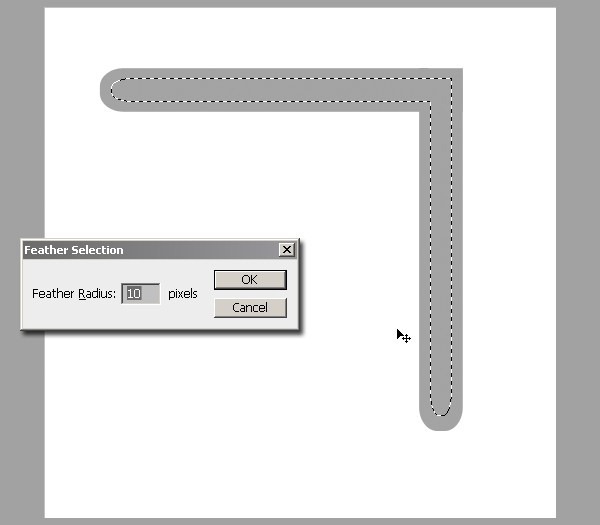
Step 9 - Filling with White.
Hit "D" on keyboard to set default color. "Cmd/Ctrl + Delete" to fill the selection with background color (white).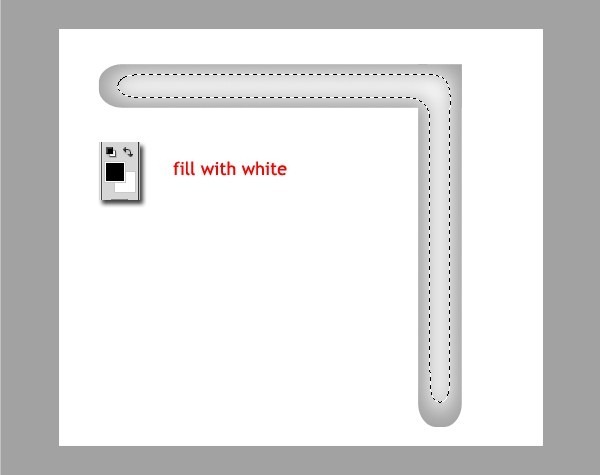
Step 10 - Make it Smoother.
Hit "Cmd/Ctrl + D" to deselect. Then add "Gaussian Blur" onto this highlight. Click Filter > Blur > Gaussian Blur and give 5 pixels. Then reduce the opacity layer to 50%. So it become smoother. But, the Gaussian Blur may increase its size. So make it into clipping mask to the lower layer. Just hit "Cmd + Opt + G" / "Ctrl + Alt + G". The highlight will be inside the shape of roof.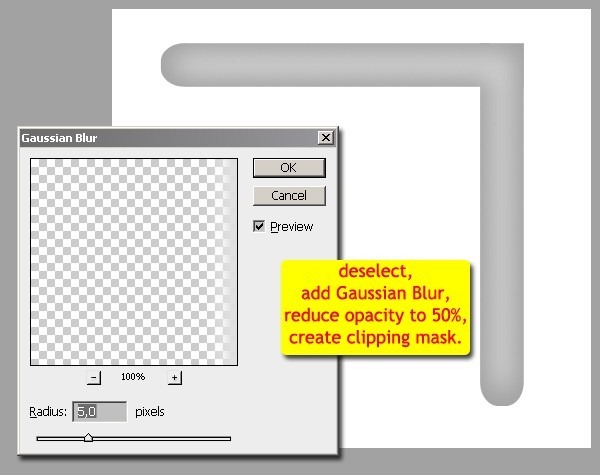
Step 11 - Rotating -45º
Select both layers at once ("highlight" and "shape 1"). Press "Cmd/Ctrl + T" and rotate -45º. Use "Shift" for easier rotating.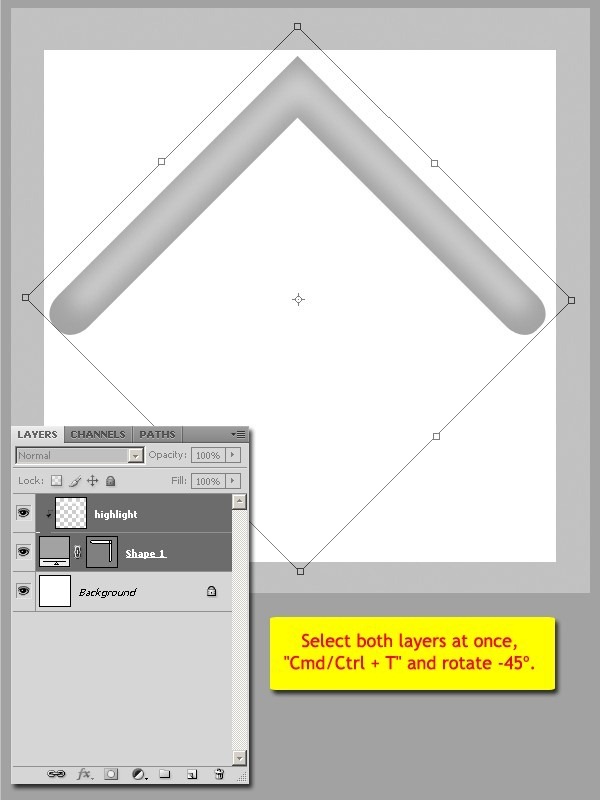
Step 12 - Adding Layer Style.
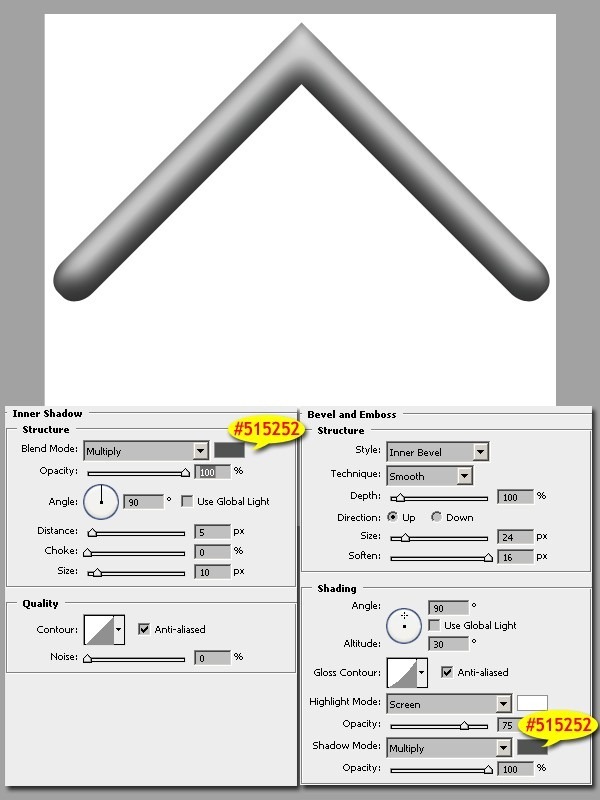
Add layer style onto shape layer.Inner Shadow
- Blend Mode : Multiply
- Set the shadow color to #515252
- Opacity : 100%
- Angle : 90º
- Distance : 5 px
- Choke : 0%
- Size : 10 px
- Style : Inner Bevel
- Technique : Smooth
- Depth : 100%
- Direction : Up
- Size : 24 px
- Soften : 16 px
- Shadow Mode : Multiply
- Set the shadow color to #515252
- Shadow opacity : 100%
Step 13 - Creating Shape Again.
With Rectangle Tool, create shape above background. And the color setting is #677479. And don't forget to use "Shift" to make a square rectangle.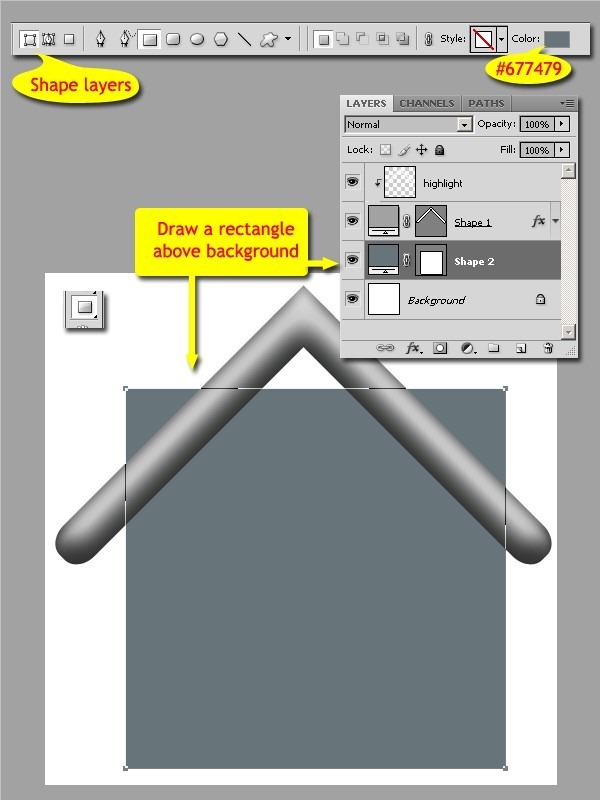
Step 14 - Rotating, Scaling and Placing.
Rotate the new shape, scale and place it proportionally.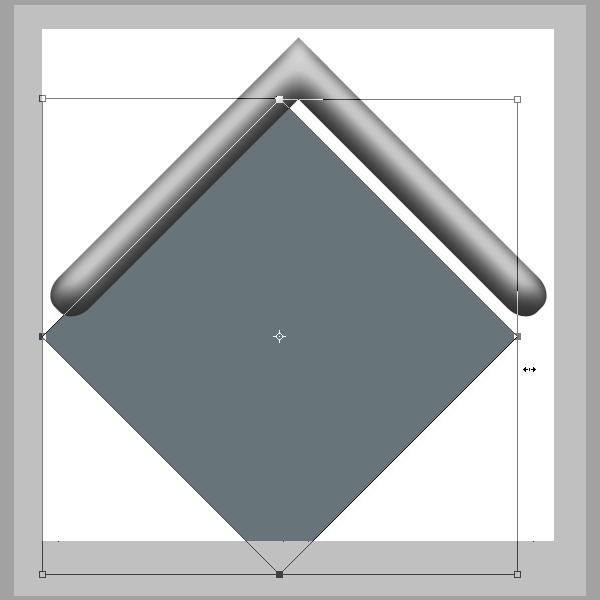
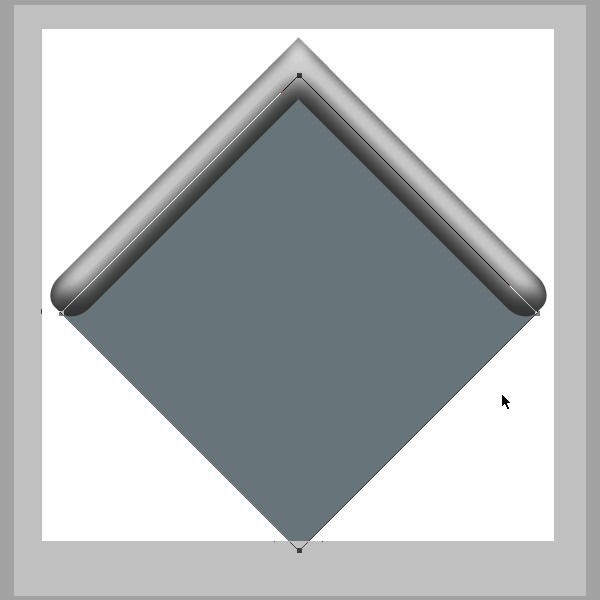
Step 15 - Grouping.
Group these layers by select them and press "Cmd/Ctrl + G". Give name "roof" to this group.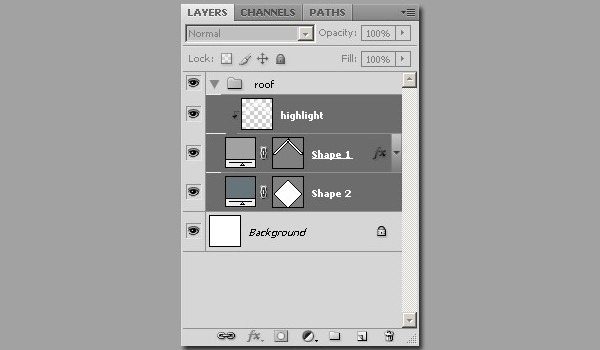
Step 16 - Drawing Path For Front Side.
Hide the "shape 2" layer by clicking eye icon. Then using rectangle tool, draw a rectangle outside the group, above the "Background" layer. Shown below.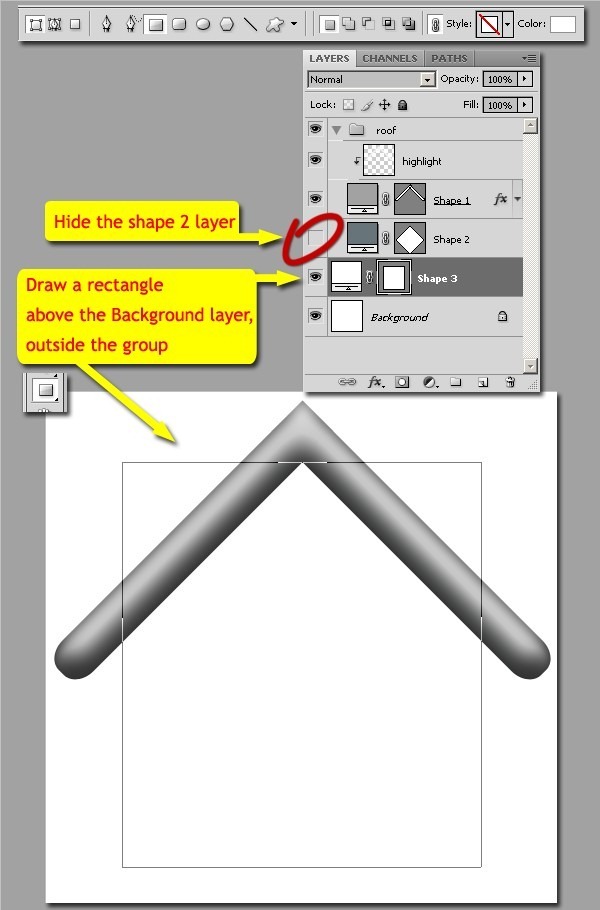
Note : while drawing, hold the spacebar key in order to be able to place path in center by dragging mouse.
Gradient Overlay
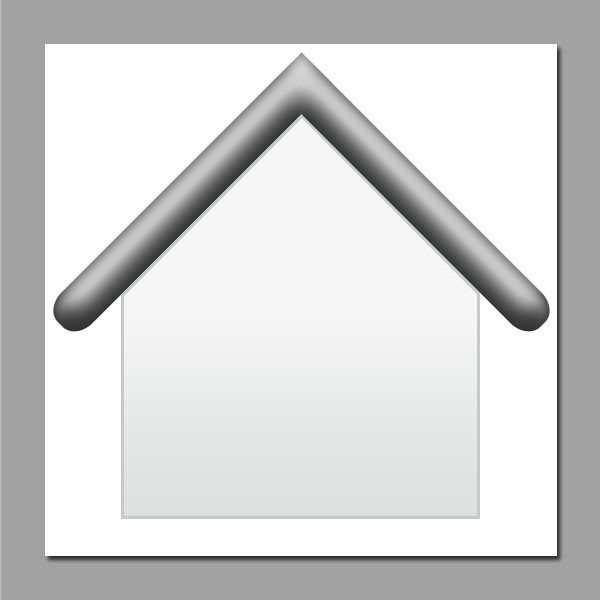
 After layer style added, our image should look like this:
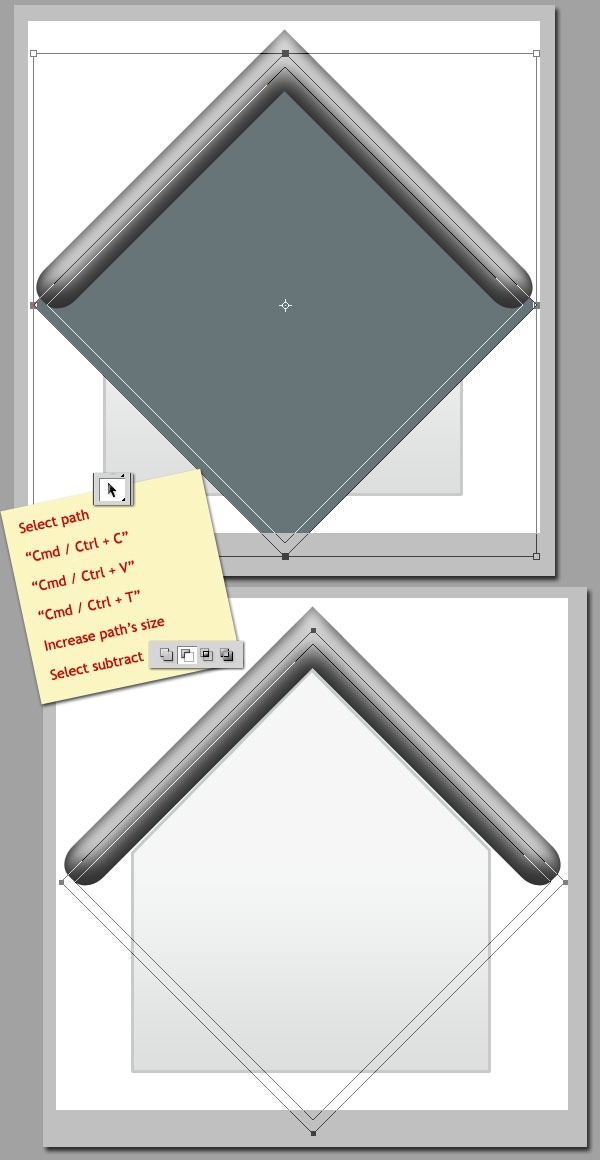
 To duplicate the path, use Path Selection Tool. Select Path. Copy the
path with "Cmd / Ctrl + C" and paste the path with "Cmd / Ctrl + V".
And then resize the path, "Cmd / Ctrl + T", make the path copy bigger
than original path. After that, on the option bar, select "subtract from
shape area".
Step 17 - Modifying Path - Add Anchor Points.
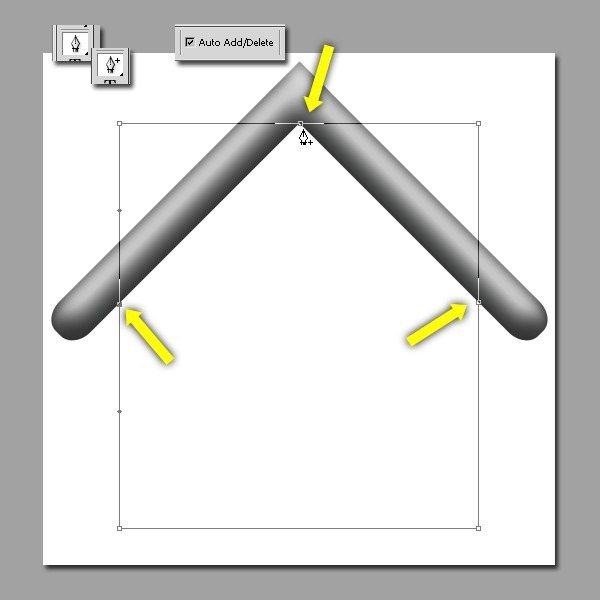
Using Pen Tool with "Auto Add/Delete, add anchor points on three places below. The pointer will automatic changed to Add Anchor Point Tool when brought nearer to path.
Step 18 - Modifying Path - Converting Points.
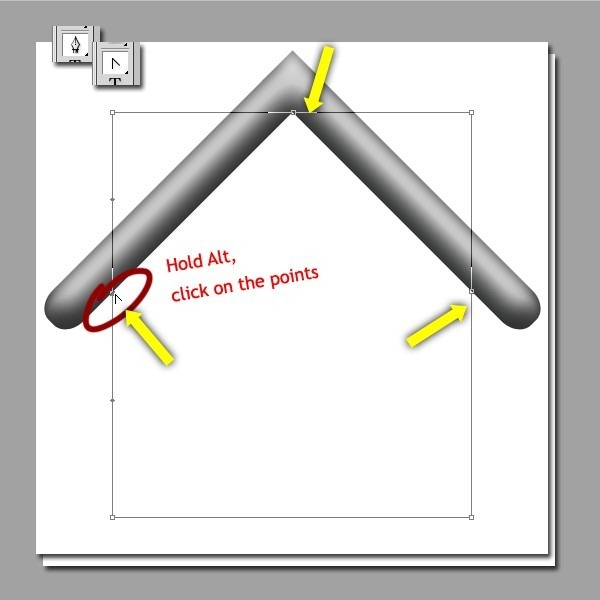
While Pen Tool still active, hold down the "Alt" key, pointer will be changed to Convert Point Tool. Click the anchor points we've just already created.
Step 19 - Modifying Path - Deleting Unnecessary Points.
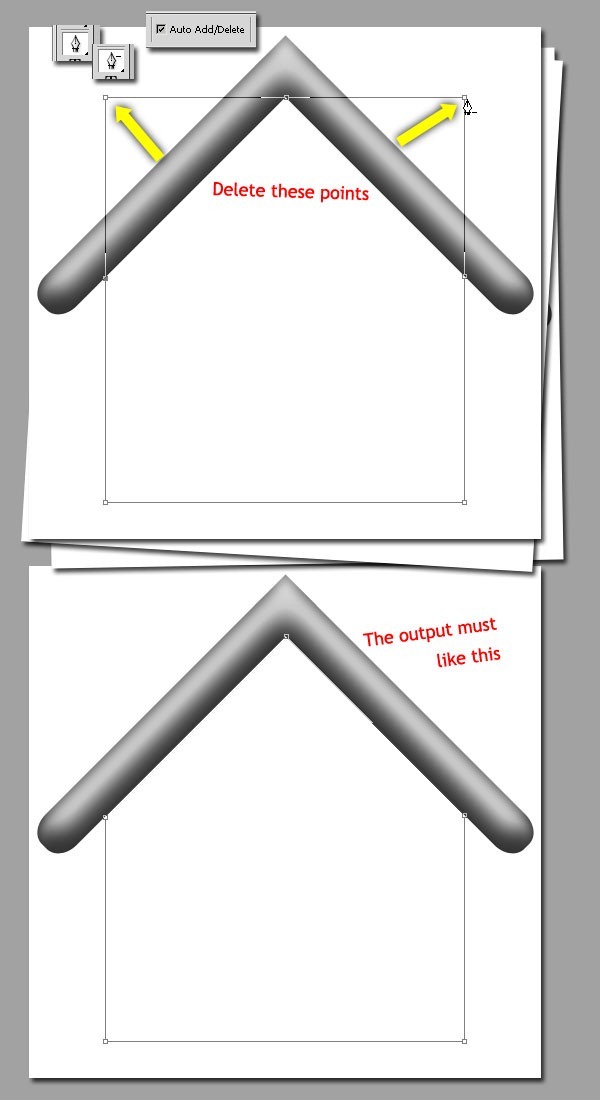
There are two unnecessary points wich must be deleted. Use Pen Tool with "Auto Add/Delete". The pointer will automatic changed to Delete Anchor Point Tool when brought nearer to anchor point.
Step 20 - Adding Layer Style.
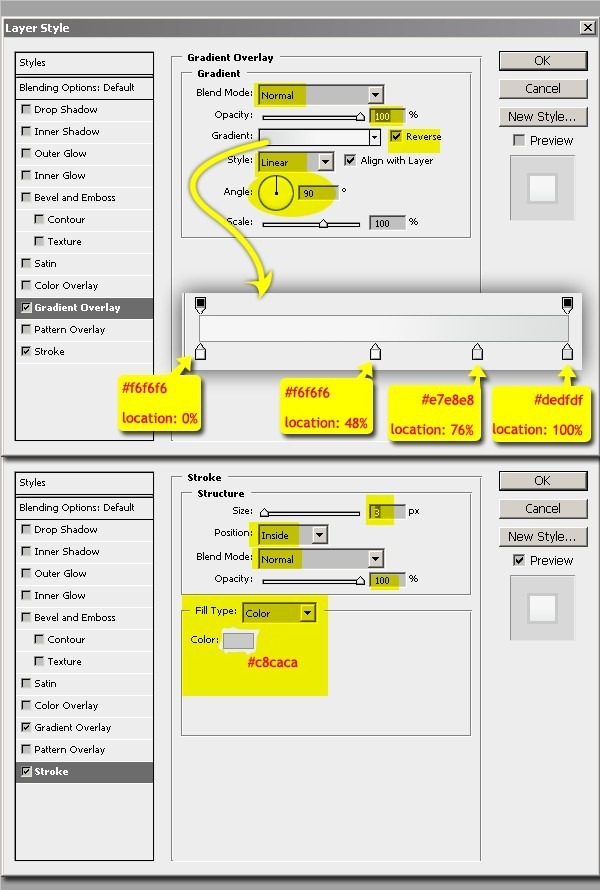
Add layer style with following parameters.Gradient Overlay
- Blend Mode : Normal
- Opacity : 100%
- Angle : 90º
- Style : Linear
- Scale : 100 px
- Custom Gradient with following stops:
- #f6f6f6 on location 0%
- #f6f6f6 on location 48%
- #e7e8e8 on location 76%
- #dedfdf on location 100%
- Size : 3 px
- Position : inside
- Blend Mode : Normal
- Opacity : 100%
- Fill Type : Color
- Set the stroke color to #c8caca


Step 21 - Back to Roof - Duplicating Path.
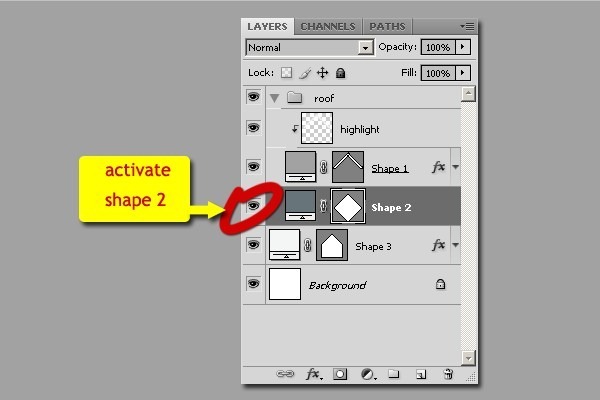
Activate shape 2. We will edit it.


No comments:
Post a Comment