


Photo
တစ္ပံုကိုေကာင္းမြန္စြာဖန္တီနို္တယ္softwareေကာင္းေလးတစ္ခုပါHDRsoft
Photomatix ကိုေတာ့ဘယ္လို Use လုပ္မယ္ဆိုတာေတာ့ ၾကည့္၇ေအာင္ေပ့ါဗ်ာ။
HDR ဓာတ္ပုံ ၁-ပုံ
ဖန္တီးမယ္ဆုိရင္ ဓာတ္ပုံ ၁-ပုံတည္းကိုပဲ မတူတဲ့ exposure ၃-မ်ဳိးနဲ႔
႐ိုက္ၿပီး ျပန္ေပါင္းေပးရပါတယ္… DSLR ကင္မရာႀကီးေတြမွာ ဆုိရင္ေတာ့ မတူတဲ့
exposure ေတြကို ႐ုိက္ကူးေပးမယ့္ bracketing function ပါပါတယ္… ကင္မရာမွာ
ပါတဲ့ bracketing function နဲ႔ ဓာတ္ပုံေတြ ႐ုိက္ၿပီး ကြန္ပ်ဴတာထဲ ေရာက္မွ
HDR ဓာတ္ပုံလုပ္ေပးႏုိင္တဲ့ software ေတြနဲ႔ ျပန္လုပ္တာ
ပုိမုိေကာင္းမြန္တဲ့ပုံေတြကို ရရွိပါတယ္…မယံုရင္ေအာက္မွာၾကည့္လိုက္ပါဗ်ာ။
Photomatix Pro processes multiple photographs of a high contrast scene into a single image with details in both highlights and shadows. Photomatix offers two types of processes to increase the dynamic range. One process
is called HDR Tone Mapping, the other Exposure Blending. Both processes
are designed to produce an image with an increased apparent dynamic
range, but their results are different. You should try both and then
choose the result that works best with your images. The first section of
this manual provides tips for taking photographs intended for High
Dynamic Range (HDR) processing in Photomatix Pro. The second section
describes how to create HDR images and process them through Tone
Mapping. The third section deals with the Exposure Blending functions,
and the fourth section with the Batch Processing tool. Finally, section
five provides a few tips and techniques.
Features:
Generation of HDR (High Dynamic Range) images from differently exposed images
Conversion of single RAW file into pseudo-HDR image
Tone Mapping tool for revealing highlights and shadows details in HDR image
HDR Viewer shows local HDR image data at the appropriate exposure
Display of HDR Histogram (logarithmic)
Ability to batch tone map single HDR images
Function to tone map large HDR image files while benefiting from a preview
Read and Write support for Radiance RGBE (.hdr), OpenEXR (.exr) and Floating Point TIFF
Color managed HDR workflow: passing trough of ICC color profiles from the source to the tone mapped images, and color managed display
Four algorithms for Exposure Blending
Automatic alignment option for hand-held images with two alignment methods available
Preview and Loupe available for all Exposure Blending methods
Ability to select the images for method H&S - 2 images
Automatic Batch Processing
Support JPEG, TIFF, Radiance RGBE, OpenEXR, PNG, PSD, RAW files from several camera models
အခုေတာ့
က်ေတာ္ ဓာတ္ပုံ ၁-ပုံတည္းကို Lightroom 3.0 ရယ္... HDR လုပ္တဲ့ ေဆာ့ဝဲ
ျဖစ္တဲ့ photomatix pro 4.0 software ၂-ခု အသုံးျပဳၿပီး HDR
ဓာတ္ပုံလုပ္နည္း အဆင့္ဆင့္ကို ေျပာမွာပါ…
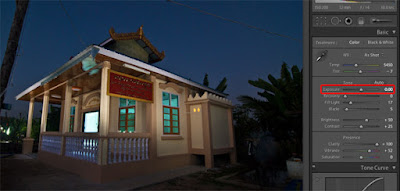
Lightroom ထဲဝင္ၿပီး က်ေတာ္တုိ႔ HDR လုပ္ခ်င္တဲ့ပုံကို ဓာတ္ပုံေတြ ျပင္ဆင္ တည္းျဖတ္တဲ့ Develop မွာ ေရြးထားပါ... အေပၚကပုံ အနီေရာင္ ေဘာင္ခတ္ျပထားတဲ့ Exposure ေနရာမွာ 0.00 နဲ႔ပဲ File ထဲက Export နဲ႔ ဖုိင္ကို export ပုိ႔ပါ...
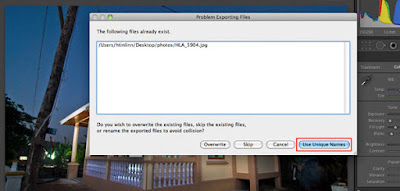
ေနာက္ထပ္ တစ္ပုံအတြက္ Exposure ရဲ႕ 0.00 ေနရာမွာ -2 ေျပာင္းၿပီး ထပ္ၿပီး Export ပုိ႔ပါတယ္... အေပၚက export လုပ္ထားတဲ့ ဖုိင္နာမည္ အတုိင္း ထပ္တူက် တူေနတဲ့အတြက္ ေနာက္ဖုိင္ တစ္ခုအေနနဲ႔ ျဖစ္ေအာင္ အေပၚကပုံမွာ ျပထားတဲ့ ပုံအတုိင္း Use Unique Names ကို click ႏွိပ္ပါ... က်ေတာ့္ပုံက အေတာ္ေလး ေမွာင္ေနတယ္လုိ႔ ထင္တဲ့အတြက္ Exposure 1.00 ေျပာင္းၿပီး export လုပ္ပါတဲ့ အျပင္ Exposure 2.00 ေျပာင္းၿပီး export ထပ္လုပ္ပါတယ္... ဒီ export လုပ္တဲ့ ၂-ခါ စလုံးမွာ ဖုိင္ ေနာက္ထပ္ နာမည္နဲ႔ ထပ္ထြက္ေအာင္ Use Unique Names ကို click ႏွိပ္ပါတယ္...
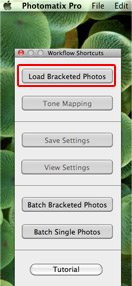
PhotoMatix Pro ကို
ဖြင့္တဲ့အခါ အေပၚက ျပထားတဲ့ ပုံအတုိင္း ေပၚလာတဲ့ အခါ Load Bracketed Photos
ကို click လုပ္ပါတယ္... Generate HDR - Selecting source images
ေခါင္းစဥ္နဲ႔ dialog box ေပၚလာတဲ့အခါ browse button ကို ႏွိပ္ပါတယ္...
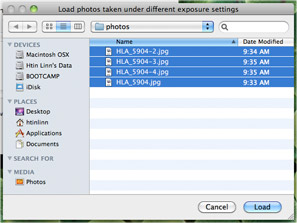
Lightroom ကေန export လုပ္ထားတဲ့ ဓာတ္ပုံေတြကို select ေပးၿပီး Load ကို ႏွိပ္ပါတယ္...
က်ေတာ္
Lightroom ကေန export လုပ္တာ file name ကို မူရင္း အတုိင္းပဲ
ျပန္ေပးခုိင္းထား ပါတယ္... ပထမဆုံး တစ္ပုံကေတာ့ မူရင္းအတိုင္း ပါပဲ...
တူညီတဲ့ folder တစ္ခုတည္းမွာ နာမည္တူ file name ထပ္ရွိလုိ႔ မရတဲ့ အတြက္
ေနာက္ထပ္ ဖုိင္ေတြ export လုပ္တဲ့ အခ်ိန္တုန္းက Use
Unique Names ကိုေရြးခဲ့တဲ့ အတြက္ မူရင္း ဖုိင္နာမည္ရဲ႕ေနာက္မွာ -2 , -3,
-4 ေတြနဲ႔ဆုိၿပီး ဖုိင္ေတြထပ္ ထြက္လာတာပါ... အေပၚက ပုံထဲမွာ ၾကည့္မယ္ဆုိ
HLA_5904.jpg က ပထမဆုံး export လုပ္တဲ့ဖုိင္ပါ... HLA_5904-2.jpg, HLA_5904-3.jpg, HLA_5904-4.jpg ကေတာ့ ေနာက္မွ တစ္ခုၿပီး တစ္ခု export လုပ္ခဲ့တဲ့ ဖုိင္ေတြပါ...
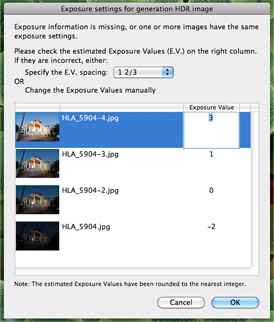
က်ေတာ္တုိ႔
ေရြးလုိက္တဲ့ ပုံေတြကို အေပၚမွာ ျပထားတဲ့ ပုံအတုိင္း ေဖာ္ျပေပးပါတယ္...
ပုံေလး ပုံတဲ့မွာ အေပၚဆုံးက ျပထားတဲ့ပုံရဲ႕ မူရင္း exposure က 2 ကို 3
လုိ႔ေျပေနတဲ့ အတြက္ 2 လုိ႔ ျပင္ၿပီး OK ကို ႏွိပ္ပါတယ္...
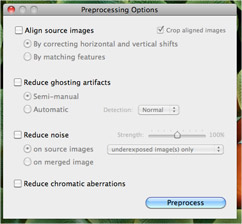
အေပၚမွာ ျပထားတဲ့
ပုံအတုိင္း Preprocessing Options ဆုိတဲ့ dialog box ေပၚလာပါလိမ့္မယ္...
က်ေတာ္တုိ႔က ကင္မရာမွာ ပါတဲ့ bracketing function နဲ႔ ႐ုိက္ထားတဲ့ ပုံေတြ
ျဖစ္မယ္ဆုိ Align source images ကို ေရြးသသင့္ပါတယ္... က်ေတာ္ အခု လုပ္တဲ့
ပုံက ၁-ပုံတည္းကို ပဲ ကြန္ပ်ဴတာထဲမွာ Exposure ေျပာင္းထားတာ ျဖစ္တဲ့ အတြက္
Align source images ကို မေရြးေတာ့ပဲ Preprocess ကို ႏွိပ္လုိက္ပါတယ္...
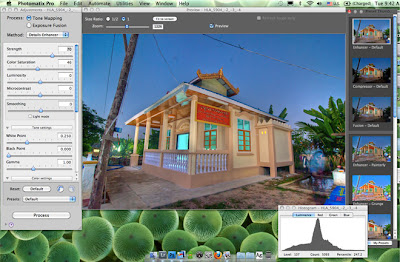
Photomatix Pro 4.0
မွာ preset ေတြပါလာပါတယ္... က်ေတာ့္ အေပၚက ပုံထဲမွာ ညာဘက္ကရွိတဲ့
ပုံေလးေတြနဲ႔ နမူနာ ျပထားတဲ့ အပုိင္းပါ... Preset Thumbnails လုိ႔
ေခၚပါတယ္... အဲဒီ Preset Thumbnails က ပုံမွန္ ေအာက္ဘက္မွာ ရွိပါတယ္...
က်ေတာ္က ညာဘက္ကို ေျပာင္းထားတာပါ... အဲဒီထဲက ဒီပုံ အတြက္ က်ေတာ့္
စိတ္ႀကိဳက္ ျဖစ္မိတဲ့ Enhancer - Default ေရြးလုိက္ပါတယ္... ၿပီးေတာ့
ထပ္ၿပီး ဘယ္ဘက္ panel ထဲမွာလည္း စိတ္ႀကိဳက္ ထပ္ၿပီး ခ်ိန္ညိႇပါတယ္...
စိတ္ႀကိဳက္ျဖစ္ၿပီဆုိရင္ေတာ့ ဘယ္ဘက္ panel ေအာက္ဆုံးက Process button ကို
ႏွိပ္ပါ...
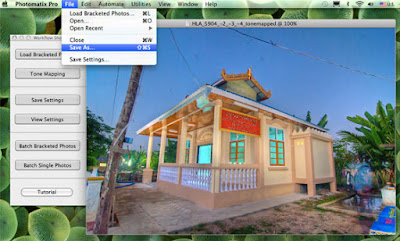
ထြက္လာတဲ့ HDR ပုံကို
သိမ္းဖုိ႔ အတြက္ File Menu ထဲက Save As... ကို ေရြးၿပီး ကိုယ္လုိခ်င္တဲ့
ဖုိင္ အမ်ဳိးစားေရြးၿပီး သိမ္းႏုိင္ပါတယ္...
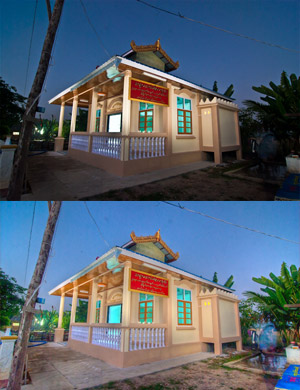
အေပၚမွာ ျပထားတဲ့ ပုံ
၂-ပုံထဲမွာ အေပၚပုံက မူရင္းပုံပါ... ေအာက္ပုံကေတာ့ HDR လုပ္ထားတဲ့ပုံပါ...
ဘုန္းႀကီးေၾကာင္းတဲ့ တံခါးမႀကီးကို ၾကည့္လုိက္ပါ... အေပၚပုံမွ အျဖဴေရာင္ပဲ
ျမင္ရမွာ ျဖစ္ၿပီး HDR လုပ္ထားတဲ့ ပုံမွာ အတြင္းက အခန္းအေရာင္
အျပာႏုေရာင္ကိုပါ လွမ္းျမင္ေနရပါတယ္.
Download Here
===
HDRsoft Photomatix Pro 5.0.4 for 32 bit
HDRsoft Photomatix Pro 5.0.4 for 64 bit
for All serial


No comments:
Post a Comment