သင္ တကယ္ PROFESSIONAL တစ္ေယာက္ၿဖစ္ေနၿပီလား? ဆိုတာက်ေနာ္ စိတ္မ၀င္စားပါ
GRAPHIC DESIGN ထက္ 3D DRAWING က အဆင့္ၿမင့္လြန္းေနတာကို
ေလ့လာၾကည့္ၾကပါဦးစို ့။
ေနာက္တစ္ခ်က္က ဒီ 3D DRAWING မွာ အရာ၀တၳဳတိုင္းရဲ့ အရိပ္ အလင္းအေမွာင္အတိုင္းအတာ စတာေတြကို
သဘာ၀က်က် အခ်ိဳးအစား ပီပီၿပင္ၿပင္ ေရးဆြဲရတာေၾကာင့္ ပန္းခ်ီသမားနဲ ့အၿငင္းပြားရဖြယ္ရာရွိေနပါတယ္။
က်ေနာ္ တစ္ခါက MYANMAR IT DEVELOPMENT မွာေရးဖူးတဲ့ ေဆာင္းပါးတစ္ခုထဲကလို
တကယ့္ PROFESSIONALေဘာလံုးသမားတစ္ေယာက္ဆိုတာ
ေနရာမေရြး ကြင္းမေရြးပဲ ေနရာႏွံ ့မွာ ကန္ခြင့္ရမွာေသခ်ာပါတယ္။
က်ေနာ္ အခ်ိန္နဲ ့ကန့္သတ္ၿပီး internet သံုးရတာေၾကာင့္
က်ေနာ့္ သင္ခန္းစာေတြ နည္းနည္း မ်ားေနပါလိမ့္မယ္။
လိုက္ ၾကိဳးစား ၾကည့္ၾကပါဦး။
မွတ္ခ်က္။ ။ ( REFERENCE:) INTERNATIONAL PROFESSIONAL မ်ားေရးသားထားေသာ
SITES LINK RSM မ်ားမွ ကူးယူေဖာ္ၿပေပးပါသည္။

RESOURCE NEEDED Font: HURTMOLD : http://www.dafont.com/search.php?psize=m&q=HURTMOLD_
STEP 1
Open a new document from 2362px x 2362 px, Resolution: 300 px / inch. Calling “HTC Smartphone”.
With the Rounded Rectangle Tool (U), draw a rectangle and set the fill color: # 242527; center the shape in the document. Do not rasterize the layer.
In the lower side of the form, just created, add a dot in the center; use Add Anchor Point Tool .
Select the point and adjust its position with Direct Selection Tool (A); lower it just a few millimeters.
Let’s repeat the procedure on the top of the form.


Duplicate the layer (let’s call it “Silver“) and fill it with color # 5a5a5c. Move towards to the ‘top.
Select the layer Silverand rasterize it.
To emphasize the silver effect, go to Filter – Noise – Add Noise: Amount: 20%, Distribution: Uniform, Monochromatic. Select once more the Silver layer choose “Create Clipping Mask“
Select Silver, right click, Blending Options and, finally, apply the ‘drop shadoweffect with the values:

STEP 2
Duplicate the first layer we created, by pressing Ctrl+J, and place it above the Silver layer. We apply the ‘Inner Gloweffect (Blend Mode: Normal, Opacity 41%, Color # 000000, and Chock 14% Size 92 px). Adjust fill to 0.

Duplicate this layer and reduce a little bit the dimension.Take Fill: 0 and Opacity: 54%.Then apply this effects:

Add Layer Maskand apply the gradient from top to bottom. These steps will define the shadows and reflections.

STEP 3
Create a new layer; in thise one, with the Ellipse Tool (U), create an oval color # ffffff. Rasterize the layer and go to Filter – Blur – Gaussian Blur. Radius: 32 px. Set Opacity: 25%

STEP 4
Let’s create now the slots for the loudspeakers on the top. With Rounded Rectangle tool (U)we draw the first slot.
Radius: 0.5 cm, and fill color # 6d6e71.

Before you apply the effects in the loudspeakers layer, you must make a new pattern.
Then open a new document from 2x2cm.
With the Ellipse Tool (U) hold down Shift and draw a black circle. Center the circle. To define the pattern go to Edit – Define Pattern. I called the pattern “Cerchio“.

Return to the slot designed on the document “HTC Smartphone” and apply the following layer styles:

Duplicate this layer and move it about 0.5 cm from the ‘other. Center them on top of our smartphone.

Here ends the first part of the design. For a neater job, board to group all these layer. Go to Layer – Group Layers. I called the group “Base“.
STEP 5
Let’s to create the details of the phone.
Let’s start create the circular sensor in the lower side of the HTC. With the Ellipse tool (U),draw a small white circle and apply the following styles:

Create now the little ones little circle in relief inside of the circular sensor. To do this duplicate the layer and slightly shrunken. We bring the layer’s fill 0 and change the layer style.
Duplicate the layer and out again. Repeat the operation until arrived to the circle final that will be a point!! Group all duplicates layers


Create a new layer. With Polygonal Lasso Tool (L) draw a triangle. Need not be precise.
We define the shading that we are about to create from Gradient Editor.
First gradient inside of the triangular selection. Choice Reflected Gradientand make the gradient from the center of the selection triangle, until one of the two sides.

Second gradient. Linear gradient. From ‘angle in the middle of the circle, to the base. Ctrl+D to remove the selection. Select the layer at which we have just created the gradient. Go to Filter – Blur – Blur Gaussian – radius: 3.3 pixels. If the gradient go out from the base circle radius , we clear with a small soft rubber, with Eraser Tool (E)
Duplicate the layer and rotate it to the opposite side

Draw a black circle with the Ellipse Tool (U)and center in the sensor base circle. Apply the style.

To give a more realistic effect go to design another little reflection. To do still use the Ellipse tool (U) and create a small white oval.
With Direct Selection Tool (A) to move towards the ‘inner form of the lowest point, to create a form like below. Rotate the shape like it following the form below.
Rasterize the layer and apply Gaussian Blur (Radius: 1.5 px)

The construction of the sensor is finish. Grouping these layer in the “Sensor“
STEP 6
Now we pass to the screen. Duplicate (Ctrl + J) the first rectangle we’ ve draw at the beginning. Move the layer above all the others. Change the fill color to # 000000. Resize as an example and apply the style to Inner Glow:

At the top play the HTC logo. To do this I used the font HURTMOLD you can find here: http://www.dafont.com/search.php?psize=m&q=HURTMOLD_
Please note: The H is written in tiny, while T and C are in uppercase, but the lower body. Apply layer style

Let’s start with the “House”. It draws with simple thin rectangles. Grouped in the “Casetta“
On the side write “menu” with the same font as the logo. Being a rather thin fonts apply a small trace of 1px. Call the layer “Menu scritta“
On the right there are two other symbols. To draw the arrow go on the toolbar, choose Costom Shape Tool (U), click the arrow 18 as indicated. Go to Edit – Trasform – Flip Horizontal. Rasterize the layer and delete the bottom to get a final arrow. Call the layer “Freccia“
The last symbol is the “lens” of “google search”. To use the Ellipse Tool (U) to draw the circle. Give the layer’ s Fill 0 and apply stroke to be 3px, color # 6d6e71. With Rectangle Tool (U) draw the handle of the lens. Tilt the rectangle of about 45 ° and the lens is do! Grouping these two layers in the “Lente“.
To make things easier, grouped these symbols in the group called “Menu“.


STEP 7 (Screen Layout)
We build the screen and its layout.
Create a new layer and call it “Sfumatura .” With Marquet With Rectangular Tool (M) draw a rectangle.
Fill the selection with a gradient preset called “Spectrum“. Use Gradient Tool (G) from the bottom-left to the upper right corner.

Let’s go to create the bubbles. Create a new layer and call it “Bolle“. With Ellipse Tool (U) draw a circle, a white fill. Change blend mode to Soft Light, opacity to 60%.
Rasterize the layer. We create a more suffused effect going to Filter – Blur – Gaussian Blur – Radius 9.3 pixels.
Multiply this layer several times and each time changing the circle’ size and its opacity, and arranging layers in a disorderly way, at your leisure.
The bubbles must be inside the ‘area bounded by the gradient layer. Then select them the gradient layer. Go to Selection – Load Selection. Ctrl + Maiusc + Ito invert the selection.
Select all layers “Bolle” that come from ‘area, and press Delete so you eliminate all the excess. Group all layers “bubble” in the “ Bolle“

STEP 8 (Graphic Screen)
Now create the default graphics of the ‘HTC which appear time and date.
Create a new layer, with Rectangle Tool (U) create a black rectangle wide as the gradient layer. Then Ctrl + Tto bend the rectangle as below.

Duplicate 2-fold layer. Temporarily hide the top layer. Rasterize the two lower layers and move them like down .
Go to Filter – Blur – Gaussian Blur – Radius 10 px. For both layers blend mode to Multiply, opacity 80%
Reveal the top level. Duplicate.
In the lower layer, with Direct Selection Tool (A) select the two points at the top, and move them upwards, until the height becomes twice before.

For both higher levels change the color from black to # 6d6e71and apply styles:


Lacks some details : series of small circles on a newly-built forms.
With Ellypse Tool (U) draw a small circle, color # 6d6e71, Inner Shadow and apply the style.
Now duplicate the layer. Arrange the layers until you get a result like below.
Once you get the group of left-wing circles we call “Balls Sx“, duplicate it and call the new group “ Balls Dx “. Go to Edit – Transform-Flip horizontaland move the group on the opposite side.

At this point, missing the date and time. So with the Text tool (T)we write the date in white.
I used font Calibri Regular, 9.5 ptbody.
Place the layer in the middle of rectangles’s shadow.
In the middle there is the ‘hour (fonts: Calibri, 33 pt), and the center of the’ upper shadow of the operator ‘s name (fonts: Calibri, 9.5 pt).

Layers are grouped together to form the text in the “Schermo Basso“
STEP 9
Proceed to the top of the screen.
With the Rectangle Tool (U) to draw a rectangle thin. Fill # ffffff. Apply the gradient.

Inside this bar, there are some symbols. Let’s see how that is essential to reproduce the time, battery and notches.
TIME: rewrite the time with font Calibri regular, 8 pt, color # ffffff, without layer styles.
BATTERY: The battery can be built with two rectangles draw with Rounded Rectangle Tool (U), with Radius 0.01 cm, and merged. Apply layer styles.
With the Rectangle Tool (U) to draw on a new level, battery status, color # 7fff00. Apply Gradient Overlay.
Only the back RECEIVING SYMBOLS. Draw 4 rectangles with the Rectangle Tool (U), fill # ffffff, apply Gradient Overlay.
Group layers, from the bar to the group receiving notches “Schermo Alto“


STEP 10
We are the last things to fix.
First, the screen must have a slight effect of depth. New level with Rectangular Tool (U)to draw a large rectangle just like the background just finished (the color of the new form is irrelevant). Lower layer’s fill to 0. Apply layer styles:

STEP 11
Finally, draw the side key to adjust volume, and the top of the off / on.
With Rounded Rectangle Tool (U) (radius: 0.1 cm) draw a thin rectangle, color # 000000 and place it on the side of the phone. The same thing is done for the top button, but this must ‘be shorter.
You can apply a slight tinge to the two keys to give the reflection effect.

Ok, the tutorial ends here. You can create an ‘advertising image of your smartphone by putting it in perspective in a three-dimensional space constructed with simple shades.
I hope the tutorial will be useful for you.





GRAPHIC DESIGN ထက္ 3D DRAWING က အဆင့္ၿမင့္လြန္းေနတာကို
ေလ့လာၾကည့္ၾကပါဦးစို ့။
ေနာက္တစ္ခ်က္က ဒီ 3D DRAWING မွာ အရာ၀တၳဳတိုင္းရဲ့ အရိပ္ အလင္းအေမွာင္အတိုင္းအတာ စတာေတြကို
သဘာ၀က်က် အခ်ိဳးအစား ပီပီၿပင္ၿပင္ ေရးဆြဲရတာေၾကာင့္ ပန္းခ်ီသမားနဲ ့အၿငင္းပြားရဖြယ္ရာရွိေနပါတယ္။
က်ေနာ္ တစ္ခါက MYANMAR IT DEVELOPMENT မွာေရးဖူးတဲ့ ေဆာင္းပါးတစ္ခုထဲကလို
တကယ့္ PROFESSIONALေဘာလံုးသမားတစ္ေယာက္ဆိုတာ
ေနရာမေရြး ကြင္းမေရြးပဲ ေနရာႏွံ ့မွာ ကန္ခြင့္ရမွာေသခ်ာပါတယ္။
က်ေနာ္ အခ်ိန္နဲ ့ကန့္သတ္ၿပီး internet သံုးရတာေၾကာင့္
က်ေနာ့္ သင္ခန္းစာေတြ နည္းနည္း မ်ားေနပါလိမ့္မယ္။
လိုက္ ၾကိဳးစား ၾကည့္ၾကပါဦး။
မွတ္ခ်က္။ ။ ( REFERENCE:) INTERNATIONAL PROFESSIONAL မ်ားေရးသားထားေသာ
SITES LINK RSM မ်ားမွ ကူးယူေဖာ္ၿပေပးပါသည္။
Design an HTC – Photoshop Tutorial
FINAL IMAGE PREVIEW
RESOURCE NEEDED Font: HURTMOLD : http://www.dafont.com/search.php?psize=m&q=HURTMOLD_
STEP 1
Open a new document from 2362px x 2362 px, Resolution: 300 px / inch. Calling “HTC Smartphone”.
With the Rounded Rectangle Tool (U), draw a rectangle and set the fill color: # 242527; center the shape in the document. Do not rasterize the layer.
In the lower side of the form, just created, add a dot in the center; use Add Anchor Point Tool .
Select the point and adjust its position with Direct Selection Tool (A); lower it just a few millimeters.
Let’s repeat the procedure on the top of the form.


Duplicate the layer (let’s call it “Silver“) and fill it with color # 5a5a5c. Move towards to the ‘top.
Select the layer Silverand rasterize it.
To emphasize the silver effect, go to Filter – Noise – Add Noise: Amount: 20%, Distribution: Uniform, Monochromatic. Select once more the Silver layer choose “Create Clipping Mask“
Select Silver, right click, Blending Options and, finally, apply the ‘drop shadoweffect with the values:

STEP 2
Duplicate the first layer we created, by pressing Ctrl+J, and place it above the Silver layer. We apply the ‘Inner Gloweffect (Blend Mode: Normal, Opacity 41%, Color # 000000, and Chock 14% Size 92 px). Adjust fill to 0.

Duplicate this layer and reduce a little bit the dimension.Take Fill: 0 and Opacity: 54%.Then apply this effects:

Add Layer Maskand apply the gradient from top to bottom. These steps will define the shadows and reflections.

STEP 3
Create a new layer; in thise one, with the Ellipse Tool (U), create an oval color # ffffff. Rasterize the layer and go to Filter – Blur – Gaussian Blur. Radius: 32 px. Set Opacity: 25%

STEP 4
Let’s create now the slots for the loudspeakers on the top. With Rounded Rectangle tool (U)we draw the first slot.
Radius: 0.5 cm, and fill color # 6d6e71.

Before you apply the effects in the loudspeakers layer, you must make a new pattern.
Then open a new document from 2x2cm.
With the Ellipse Tool (U) hold down Shift and draw a black circle. Center the circle. To define the pattern go to Edit – Define Pattern. I called the pattern “Cerchio“.

Return to the slot designed on the document “HTC Smartphone” and apply the following layer styles:

Duplicate this layer and move it about 0.5 cm from the ‘other. Center them on top of our smartphone.

Here ends the first part of the design. For a neater job, board to group all these layer. Go to Layer – Group Layers. I called the group “Base“.
STEP 5
Let’s to create the details of the phone.
Let’s start create the circular sensor in the lower side of the HTC. With the Ellipse tool (U),draw a small white circle and apply the following styles:

Create now the little ones little circle in relief inside of the circular sensor. To do this duplicate the layer and slightly shrunken. We bring the layer’s fill 0 and change the layer style.
Duplicate the layer and out again. Repeat the operation until arrived to the circle final that will be a point!! Group all duplicates layers


Create a new layer. With Polygonal Lasso Tool (L) draw a triangle. Need not be precise.
We define the shading that we are about to create from Gradient Editor.
First gradient inside of the triangular selection. Choice Reflected Gradientand make the gradient from the center of the selection triangle, until one of the two sides.

Second gradient. Linear gradient. From ‘angle in the middle of the circle, to the base. Ctrl+D to remove the selection. Select the layer at which we have just created the gradient. Go to Filter – Blur – Blur Gaussian – radius: 3.3 pixels. If the gradient go out from the base circle radius , we clear with a small soft rubber, with Eraser Tool (E)
Duplicate the layer and rotate it to the opposite side

Draw a black circle with the Ellipse Tool (U)and center in the sensor base circle. Apply the style.

To give a more realistic effect go to design another little reflection. To do still use the Ellipse tool (U) and create a small white oval.
With Direct Selection Tool (A) to move towards the ‘inner form of the lowest point, to create a form like below. Rotate the shape like it following the form below.
Rasterize the layer and apply Gaussian Blur (Radius: 1.5 px)

The construction of the sensor is finish. Grouping these layer in the “Sensor“
STEP 6
Now we pass to the screen. Duplicate (Ctrl + J) the first rectangle we’ ve draw at the beginning. Move the layer above all the others. Change the fill color to # 000000. Resize as an example and apply the style to Inner Glow:

At the top play the HTC logo. To do this I used the font HURTMOLD you can find here: http://www.dafont.com/search.php?psize=m&q=HURTMOLD_
Please note: The H is written in tiny, while T and C are in uppercase, but the lower body. Apply layer style

MENU
Draw the symbols of the menu is very simple. Each symbol’s color will be # 6d6e71.Let’s start with the “House”. It draws with simple thin rectangles. Grouped in the “Casetta“
On the side write “menu” with the same font as the logo. Being a rather thin fonts apply a small trace of 1px. Call the layer “Menu scritta“
On the right there are two other symbols. To draw the arrow go on the toolbar, choose Costom Shape Tool (U), click the arrow 18 as indicated. Go to Edit – Trasform – Flip Horizontal. Rasterize the layer and delete the bottom to get a final arrow. Call the layer “Freccia“
The last symbol is the “lens” of “google search”. To use the Ellipse Tool (U) to draw the circle. Give the layer’ s Fill 0 and apply stroke to be 3px, color # 6d6e71. With Rectangle Tool (U) draw the handle of the lens. Tilt the rectangle of about 45 ° and the lens is do! Grouping these two layers in the “Lente“.
To make things easier, grouped these symbols in the group called “Menu“.


STEP 7 (Screen Layout)
We build the screen and its layout.
Create a new layer and call it “Sfumatura .” With Marquet With Rectangular Tool (M) draw a rectangle.
Fill the selection with a gradient preset called “Spectrum“. Use Gradient Tool (G) from the bottom-left to the upper right corner.

Let’s go to create the bubbles. Create a new layer and call it “Bolle“. With Ellipse Tool (U) draw a circle, a white fill. Change blend mode to Soft Light, opacity to 60%.
Rasterize the layer. We create a more suffused effect going to Filter – Blur – Gaussian Blur – Radius 9.3 pixels.
Multiply this layer several times and each time changing the circle’ size and its opacity, and arranging layers in a disorderly way, at your leisure.
The bubbles must be inside the ‘area bounded by the gradient layer. Then select them the gradient layer. Go to Selection – Load Selection. Ctrl + Maiusc + Ito invert the selection.
Select all layers “Bolle” that come from ‘area, and press Delete so you eliminate all the excess. Group all layers “bubble” in the “ Bolle“

STEP 8 (Graphic Screen)
Now create the default graphics of the ‘HTC which appear time and date.
Create a new layer, with Rectangle Tool (U) create a black rectangle wide as the gradient layer. Then Ctrl + Tto bend the rectangle as below.

Duplicate 2-fold layer. Temporarily hide the top layer. Rasterize the two lower layers and move them like down .
Go to Filter – Blur – Gaussian Blur – Radius 10 px. For both layers blend mode to Multiply, opacity 80%
Reveal the top level. Duplicate.
In the lower layer, with Direct Selection Tool (A) select the two points at the top, and move them upwards, until the height becomes twice before.

For both higher levels change the color from black to # 6d6e71and apply styles:


Lacks some details : series of small circles on a newly-built forms.
With Ellypse Tool (U) draw a small circle, color # 6d6e71, Inner Shadow and apply the style.
Now duplicate the layer. Arrange the layers until you get a result like below.
Once you get the group of left-wing circles we call “Balls Sx“, duplicate it and call the new group “ Balls Dx “. Go to Edit – Transform-Flip horizontaland move the group on the opposite side.

At this point, missing the date and time. So with the Text tool (T)we write the date in white.
I used font Calibri Regular, 9.5 ptbody.
Place the layer in the middle of rectangles’s shadow.
In the middle there is the ‘hour (fonts: Calibri, 33 pt), and the center of the’ upper shadow of the operator ‘s name (fonts: Calibri, 9.5 pt).

Layers are grouped together to form the text in the “Schermo Basso“
STEP 9
Proceed to the top of the screen.
With the Rectangle Tool (U) to draw a rectangle thin. Fill # ffffff. Apply the gradient.

Inside this bar, there are some symbols. Let’s see how that is essential to reproduce the time, battery and notches.
TIME: rewrite the time with font Calibri regular, 8 pt, color # ffffff, without layer styles.
BATTERY: The battery can be built with two rectangles draw with Rounded Rectangle Tool (U), with Radius 0.01 cm, and merged. Apply layer styles.
With the Rectangle Tool (U) to draw on a new level, battery status, color # 7fff00. Apply Gradient Overlay.
Only the back RECEIVING SYMBOLS. Draw 4 rectangles with the Rectangle Tool (U), fill # ffffff, apply Gradient Overlay.
Group layers, from the bar to the group receiving notches “Schermo Alto“


STEP 10
We are the last things to fix.
First, the screen must have a slight effect of depth. New level with Rectangular Tool (U)to draw a large rectangle just like the background just finished (the color of the new form is irrelevant). Lower layer’s fill to 0. Apply layer styles:

STEP 11
Finally, draw the side key to adjust volume, and the top of the off / on.
With Rounded Rectangle Tool (U) (radius: 0.1 cm) draw a thin rectangle, color # 000000 and place it on the side of the phone. The same thing is done for the top button, but this must ‘be shorter.
You can apply a slight tinge to the two keys to give the reflection effect.

Ok, the tutorial ends here. You can create an ‘advertising image of your smartphone by putting it in perspective in a three-dimensional space constructed with simple shades.
I hope the tutorial will be useful for you.
Easy 3D Globe in Photoshop
July 04, 2011 from abduzeedo's blog
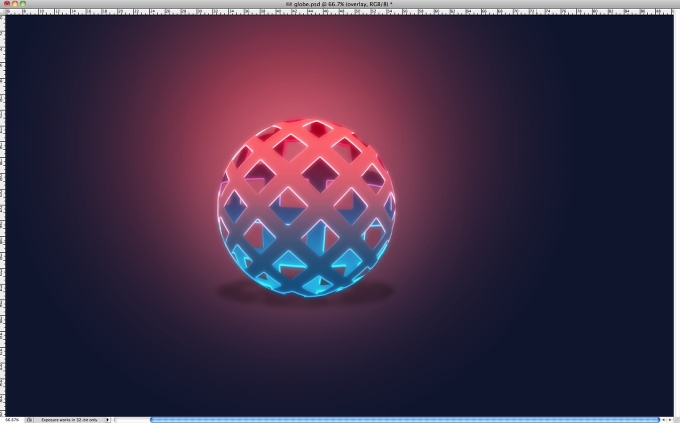
A few weeks ago a friend of mine wanted to know how to create a sort of 3D globe effect using Photoshop. I didn't know how to do that but I got really intrigued with that, so I decided to give it a try. I knew that the Spherize would work in this case but didn't know how.
So in this tutorial I will show you how to create a nice 3D globe in Photoshop using basic tools and the Spherize filter. This whole tutorial won't take more than 30 minutes but the technique is really useful especially for icons and logos.Step 1
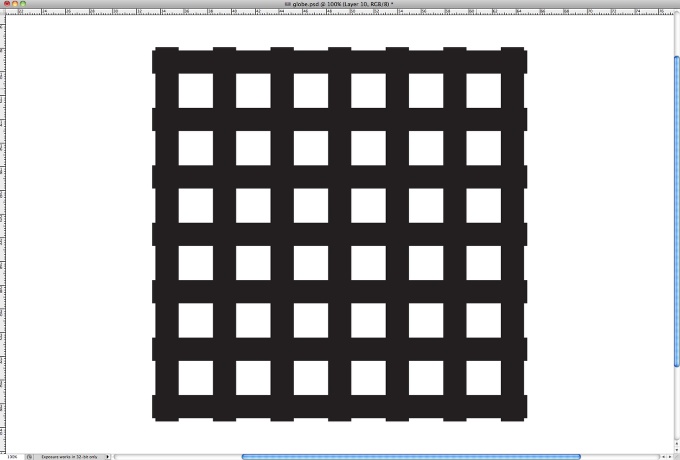
Open Photoshop and then with the Rectangle Tool (U) create a rectangle, then start duplicating it until you get 7 columns. Use the Distribute Horizontal Centers to make the distances the same. After that duplicate those 7 rectangles and rotate them to create a grid.Step 2
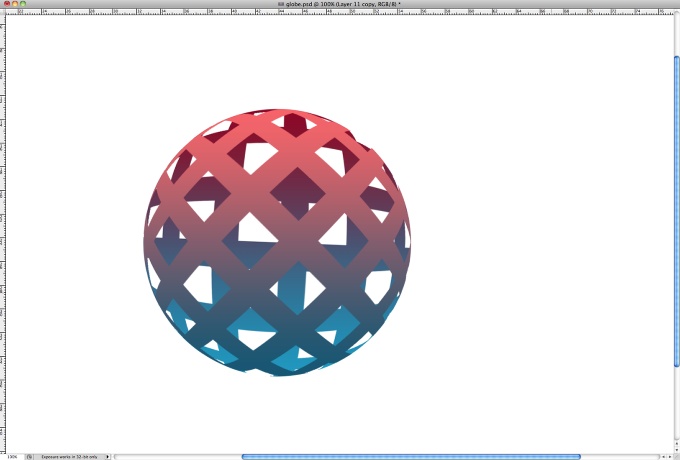
With the Elliptical Marquee Tool (M) create a circle selection like the one I did in the image below.Step 3
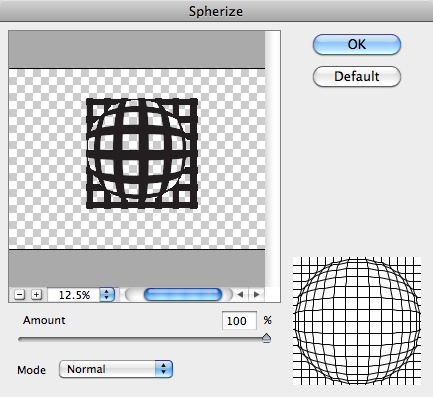
Go to Filter>Distort>Spherize. Use 100% for the Amount and Normal for the Mode.Step 4
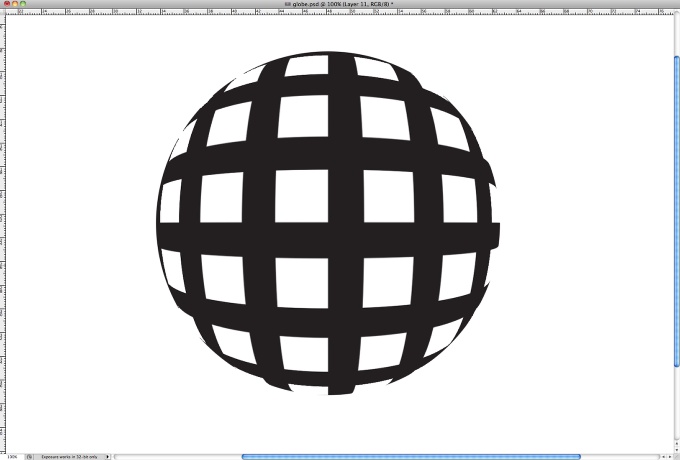
Cut the selection and paste it in order to get the front face of the globe.Step 5
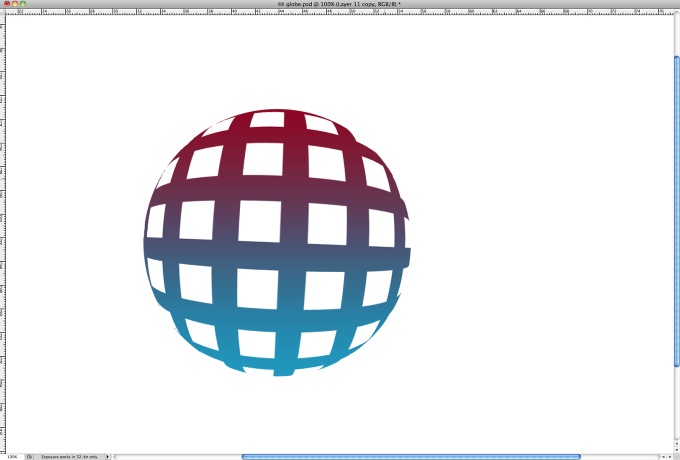
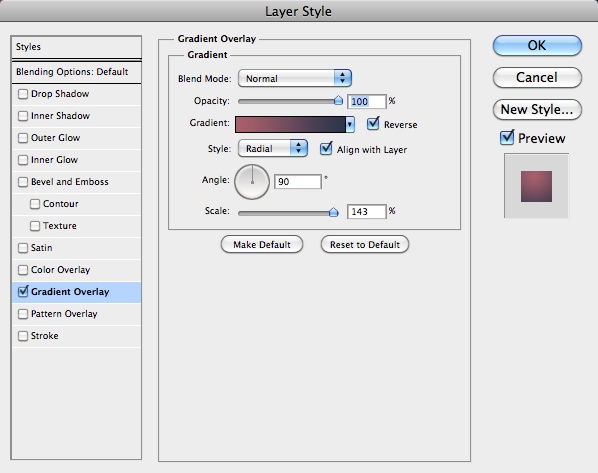
Go to Layer>Layer Styles>Gradient Overlay.Apply a gradient from dark red to light blue in linear mode. You can try with Radial as well.Step 6
Duplicate the layer and rotate it 45º Also change the gradient colors to light red on top and dark blue at the bottom. This will create a really nice 3D effect and it's super simple.Step 7
Select the background layer and go to Layer>Layer Styles>Gradient Overlay. Use (#aa616b) and (#2c354d) for the colors, Radial for the Style and 140% for the Scale. Position the center of the gradient a little bit on top of the center of the globe. To do that just click and hold to move the gradient position while you are in the Gradient Overlay properties.Step 8
Select the two globe layers and duplicate them. After that go to Layer>Merge Layers. You will have one layer with the globe. Go to Layer>Layer Styles>Color Overlay. Use black for the color. After that go to Filter>Blur>Gaussian Blur. Use 15 for the radius. Then just resize it and change the opacity to 20%. to create a nice shadow effect.Step 9
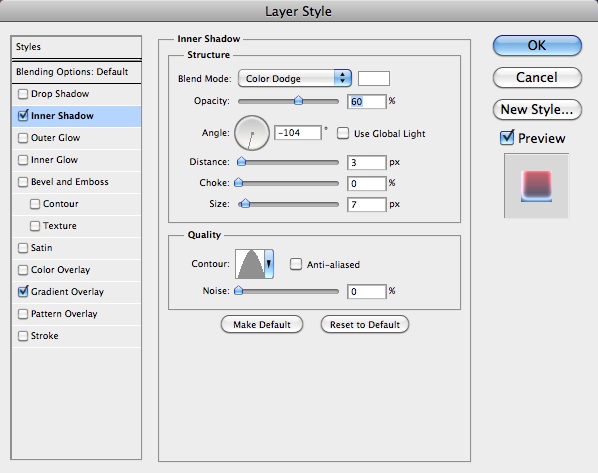
Select the front face of the globe and edit the Layer Styles. Click then on Inner Shadow and use white for the color, Color Dodge for the Blend Mode at 60% Opacity. Also change the Angle to 100%, Distance to 3 pixesl and Size to 7 pixels.Step 10
After the Inner Shadowyou will get a nice light effect in your globe.Step 11
Select all layers and duplicate them. After that go to Layer>Merge Layers to have one layer with all the image merged. Go to Filter>Blur>Gaussian Blur. Use 20 pixels for the Radius.Step 12
Change the Blend Mode to Overlayand you will get a really nice light effect.Conclusion
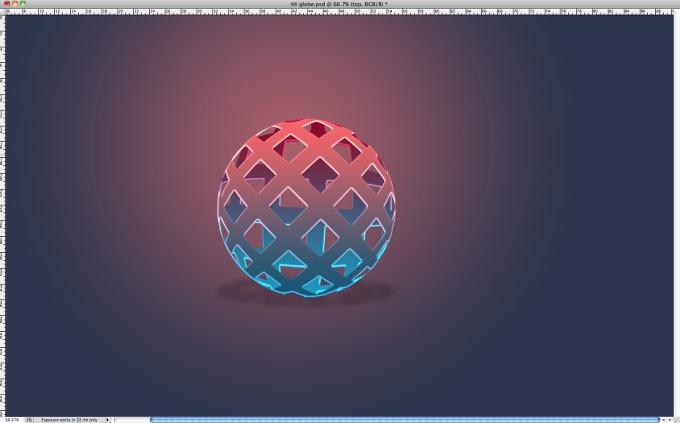
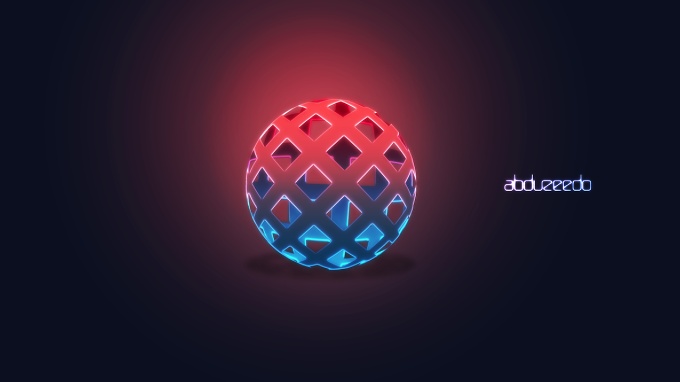
Now just add the text you want and also you can apply a texture on top. I am using a scanline pattern I created. The whole idea of this tutorial was showing how to create a nice 3D globe using only Photoshop, it's a nice technique for logos and icons and it's super simple to achieve.
You should have a final image like this.

Create a new document 600×440 with a background of your choice, select the “rounded rectangle tool” with a radius of 20px.

Draw out your mp3 player shape fill with the color black. Now goto “edit > transform > distort” OR “edit > transform > perspective” OR use a combination of both and transform your shape into something like this.

Label your layer “top”, duplicate this layer and drag the duplicated layer below the “top layer” label the duplicated layer “middle shine” and move it down once using the down arrow key on the keyboard. (ive colored mine in yellow just for your benifit we’ll be adding layer styles later.)

Now while the “middle shine” layer is selected hold down alt on your keyboard and press the down arrow key on the keyboard 15 times, everytime you click the down arrow a new layer is created and moved down. Merge all your 15 duplicated layers together as one, lable this layer “middle. (showed in green on the image below)

Do the same again but only do it 12 times and label this layer “bottom” (showed in grey on the image below)

You should have something like this. Althou it does help if you change the colors so you can see what goes where.

So to recap then we should have 4 layers top, middle shine, middle and bottom. Starting from the bottom upwards we shall add our layer styles. On the layer “bottom” add these layer styles.


Add these layer styles to the “middle” layer.


Add this layer styles to your “middle shine” layer.

And finally add these layer styles to your “top” layer.


You should end up with something like this.

Now on a seperate layer called “display LCD” create your lcd screen.

Make sure your screen is all on one layer, once done ctrl – click your layer to make a selection, then press ctrl-c to copy your lcd to the clipboard. Now create a new layer above your “top layer”, leave this blank for now, just goto “filter > vanishing point” Once vanishing point has loaded up the 1st thing we need to do is create a plane select the plain tool or press “c” just make 4 points like this.

Now press “ctrl – V” to paste your lcd screen into the vanishing point, drag your lcd screen over your plane that you made in the previous step. You may also resize it a little bit by clicking the transform tool (T). Once you think its ok press enter. You’l be left with this.

The edges of out LCD screen are abit jaggy so cut around it using your prefered cutting tool, just cut 1 pixel off all the way around.
You should be left with this.

Now add these layer styles.


You should have something like this.

Now create a logo for your mp3 player, create it the same way you did your LCD screen, once created goto vanishing point, your plane should still be intact.

Now make a selection like this.

Fill with the color white and set opacity to 20%.

Also add a line, created by the pen tool, just use the color black, this will act as our crease for the lid.

Now select the rectangle tool and create a yellow rectangle to act as a button, copy it, then goto into vanishing point and setup a new grid.

Paste your button the same way as we did the LCD screen. Press enter when done, now add these layer styles to your button.


You should have a final image like this.


Draw out your mp3 player shape fill with the color black. Now goto “edit > transform > distort” OR “edit > transform > perspective” OR use a combination of both and transform your shape into something like this.

Label your layer “top”, duplicate this layer and drag the duplicated layer below the “top layer” label the duplicated layer “middle shine” and move it down once using the down arrow key on the keyboard. (ive colored mine in yellow just for your benifit we’ll be adding layer styles later.)

Now while the “middle shine” layer is selected hold down alt on your keyboard and press the down arrow key on the keyboard 15 times, everytime you click the down arrow a new layer is created and moved down. Merge all your 15 duplicated layers together as one, lable this layer “middle. (showed in green on the image below)

Do the same again but only do it 12 times and label this layer “bottom” (showed in grey on the image below)

You should have something like this. Althou it does help if you change the colors so you can see what goes where.

So to recap then we should have 4 layers top, middle shine, middle and bottom. Starting from the bottom upwards we shall add our layer styles. On the layer “bottom” add these layer styles.


Add these layer styles to the “middle” layer.


Add this layer styles to your “middle shine” layer.

And finally add these layer styles to your “top” layer.


You should end up with something like this.

Now on a seperate layer called “display LCD” create your lcd screen.

Make sure your screen is all on one layer, once done ctrl – click your layer to make a selection, then press ctrl-c to copy your lcd to the clipboard. Now create a new layer above your “top layer”, leave this blank for now, just goto “filter > vanishing point” Once vanishing point has loaded up the 1st thing we need to do is create a plane select the plain tool or press “c” just make 4 points like this.

Now press “ctrl – V” to paste your lcd screen into the vanishing point, drag your lcd screen over your plane that you made in the previous step. You may also resize it a little bit by clicking the transform tool (T). Once you think its ok press enter. You’l be left with this.

The edges of out LCD screen are abit jaggy so cut around it using your prefered cutting tool, just cut 1 pixel off all the way around.
You should be left with this.

Now add these layer styles.


You should have something like this.

Now create a logo for your mp3 player, create it the same way you did your LCD screen, once created goto vanishing point, your plane should still be intact.

Now make a selection like this.

Fill with the color white and set opacity to 20%.

Also add a line, created by the pen tool, just use the color black, this will act as our crease for the lid.

Now select the rectangle tool and create a yellow rectangle to act as a button, copy it, then goto into vanishing point and setup a new grid.

Paste your button the same way as we did the LCD screen. Press enter when done, now add these layer styles to your button.


You should have a final image like this.

♣ kaungzawhtet>yangon> myanmar
♣http://www.kokaungzawhtet.wordpress.com/
♣http://www.kokaungzawhtet.blogspot.com/
♣http://www.kzhyangon.webs.com
♦kzh1980@gmail.com
♣http://www.kokaungzawhtet.wordpress.com/
♣http://www.kokaungzawhtet.blogspot.com/
♣http://www.kzhyangon.webs.com


No comments:
Post a Comment